Webflow to Ghost Migration: How to Convert Your Webflow Site to Ghost CMS (2026)

To migrate from Webflow to Ghost, you need to export your Webflow site's HTML/CSS/JS files and content, rebuild the design as a Ghost Handlebars theme, import your content via Ghost's JSON format, and set up 301 redirects to preserve SEO rankings. The process typically takes 2-5 days for a standard blog and requires basic familiarity with HTML and the command line.
Last updated: February 2026
Why Would You Migrate from Webflow to Ghost?
Webflow is an excellent visual website builder, but it was designed primarily for marketing sites and portfolios — not for content-heavy publishing. After running blogs on both platforms, I moved seocontentai.com to Ghost because of specific limitations I kept hitting in Webflow's CMS:
- Pricing at scale: Webflow's CMS plan starts at $23/month but limits you to 2,000 CMS items. Ghost's Creator plan at $25/month gives you unlimited posts and 1,000 members with built-in newsletter delivery — no Mailchimp or ConvertKit needed.
- Publishing speed: Ghost's editor is purpose-built for writing. Webflow requires navigating the Designer or Editor interface, which adds friction for daily publishing.
- Native memberships: Ghost has built-in membership and subscription management with Stripe integration. Webflow requires third-party tools like Memberstack ($29+/month extra).
- SEO control: Ghost generates clean, semantic HTML with automatic sitemaps, structured data, and canonical URLs. Webflow's output can be bloated with nested divs and inline styles from the visual builder.
- Performance: Ghost is built on Node.js and serves pages significantly faster than Webflow's hosting, which can struggle with large CMS collections.
That said, Webflow remains the better choice for design-heavy marketing sites, landing pages, and projects where visual design flexibility matters more than publishing workflow. This guide is for people who have decided that Ghost better fits their content-first needs.
What Do You Need Before Starting the Migration?
Before you begin, make sure you have the following ready:
| Prerequisite | Details | Why You Need It |
|---|---|---|
| Webflow paid plan | Site plan or higher (not free/Starter) | Code export requires a paid site plan |
| Ghost instance | Ghost(Pro) or self-hosted | Your destination platform |
| Node.js | v18 or later | Required for Ghost CLI and local theme development |
| Ghost CLI | npm install -g ghost-cli | For local Ghost setup and theme testing |
| Code editor | VS Code recommended | Editing Handlebars templates and CSS |
| Basic HTML/CSS knowledge | Intermediate level | Converting Webflow classes to Ghost theme styles |
| Content inventory | List of all pages, blog posts, images | Ensures nothing is missed during migration |
Time estimate: A standard blog with 20-50 posts takes 2-5 days. Complex sites with custom interactions, forms, and e-commerce integrations take 1-2 weeks.
How Do You Export Your Webflow Site?
Step 1: Export Code from Webflow
- Open your Webflow project in the Designer
- Click the Export Code button (top-right toolbar) or go to Project Settings → Code Export
- Download the ZIP file containing your HTML, CSS, and JavaScript files
The exported ZIP contains:
index.html— your homepagecss/— compiled stylesheets (includingnormalize.cssand your custom styles)js/— Webflow's JavaScript library and any custom scriptsimages/— all uploaded images- Individual HTML files for each page
Important limitation: Webflow's code export does NOT include CMS collection content (blog posts, categories, etc.). You will need to export CMS content separately — covered in Step 5 below.
Step 2: Export CMS Content
Webflow's CMS content must be exported separately:
- Go to Project Settings → CMS in the Webflow Designer
- For each collection (Blog Posts, Categories, Authors), click the Export button
- Download the CSV files
Save these CSV files — you will convert them to Ghost's JSON import format later.
How Do You Build a Ghost Theme from Webflow's Export?
This is the core of the migration — converting Webflow's static HTML output into Ghost's dynamic Handlebars template system.
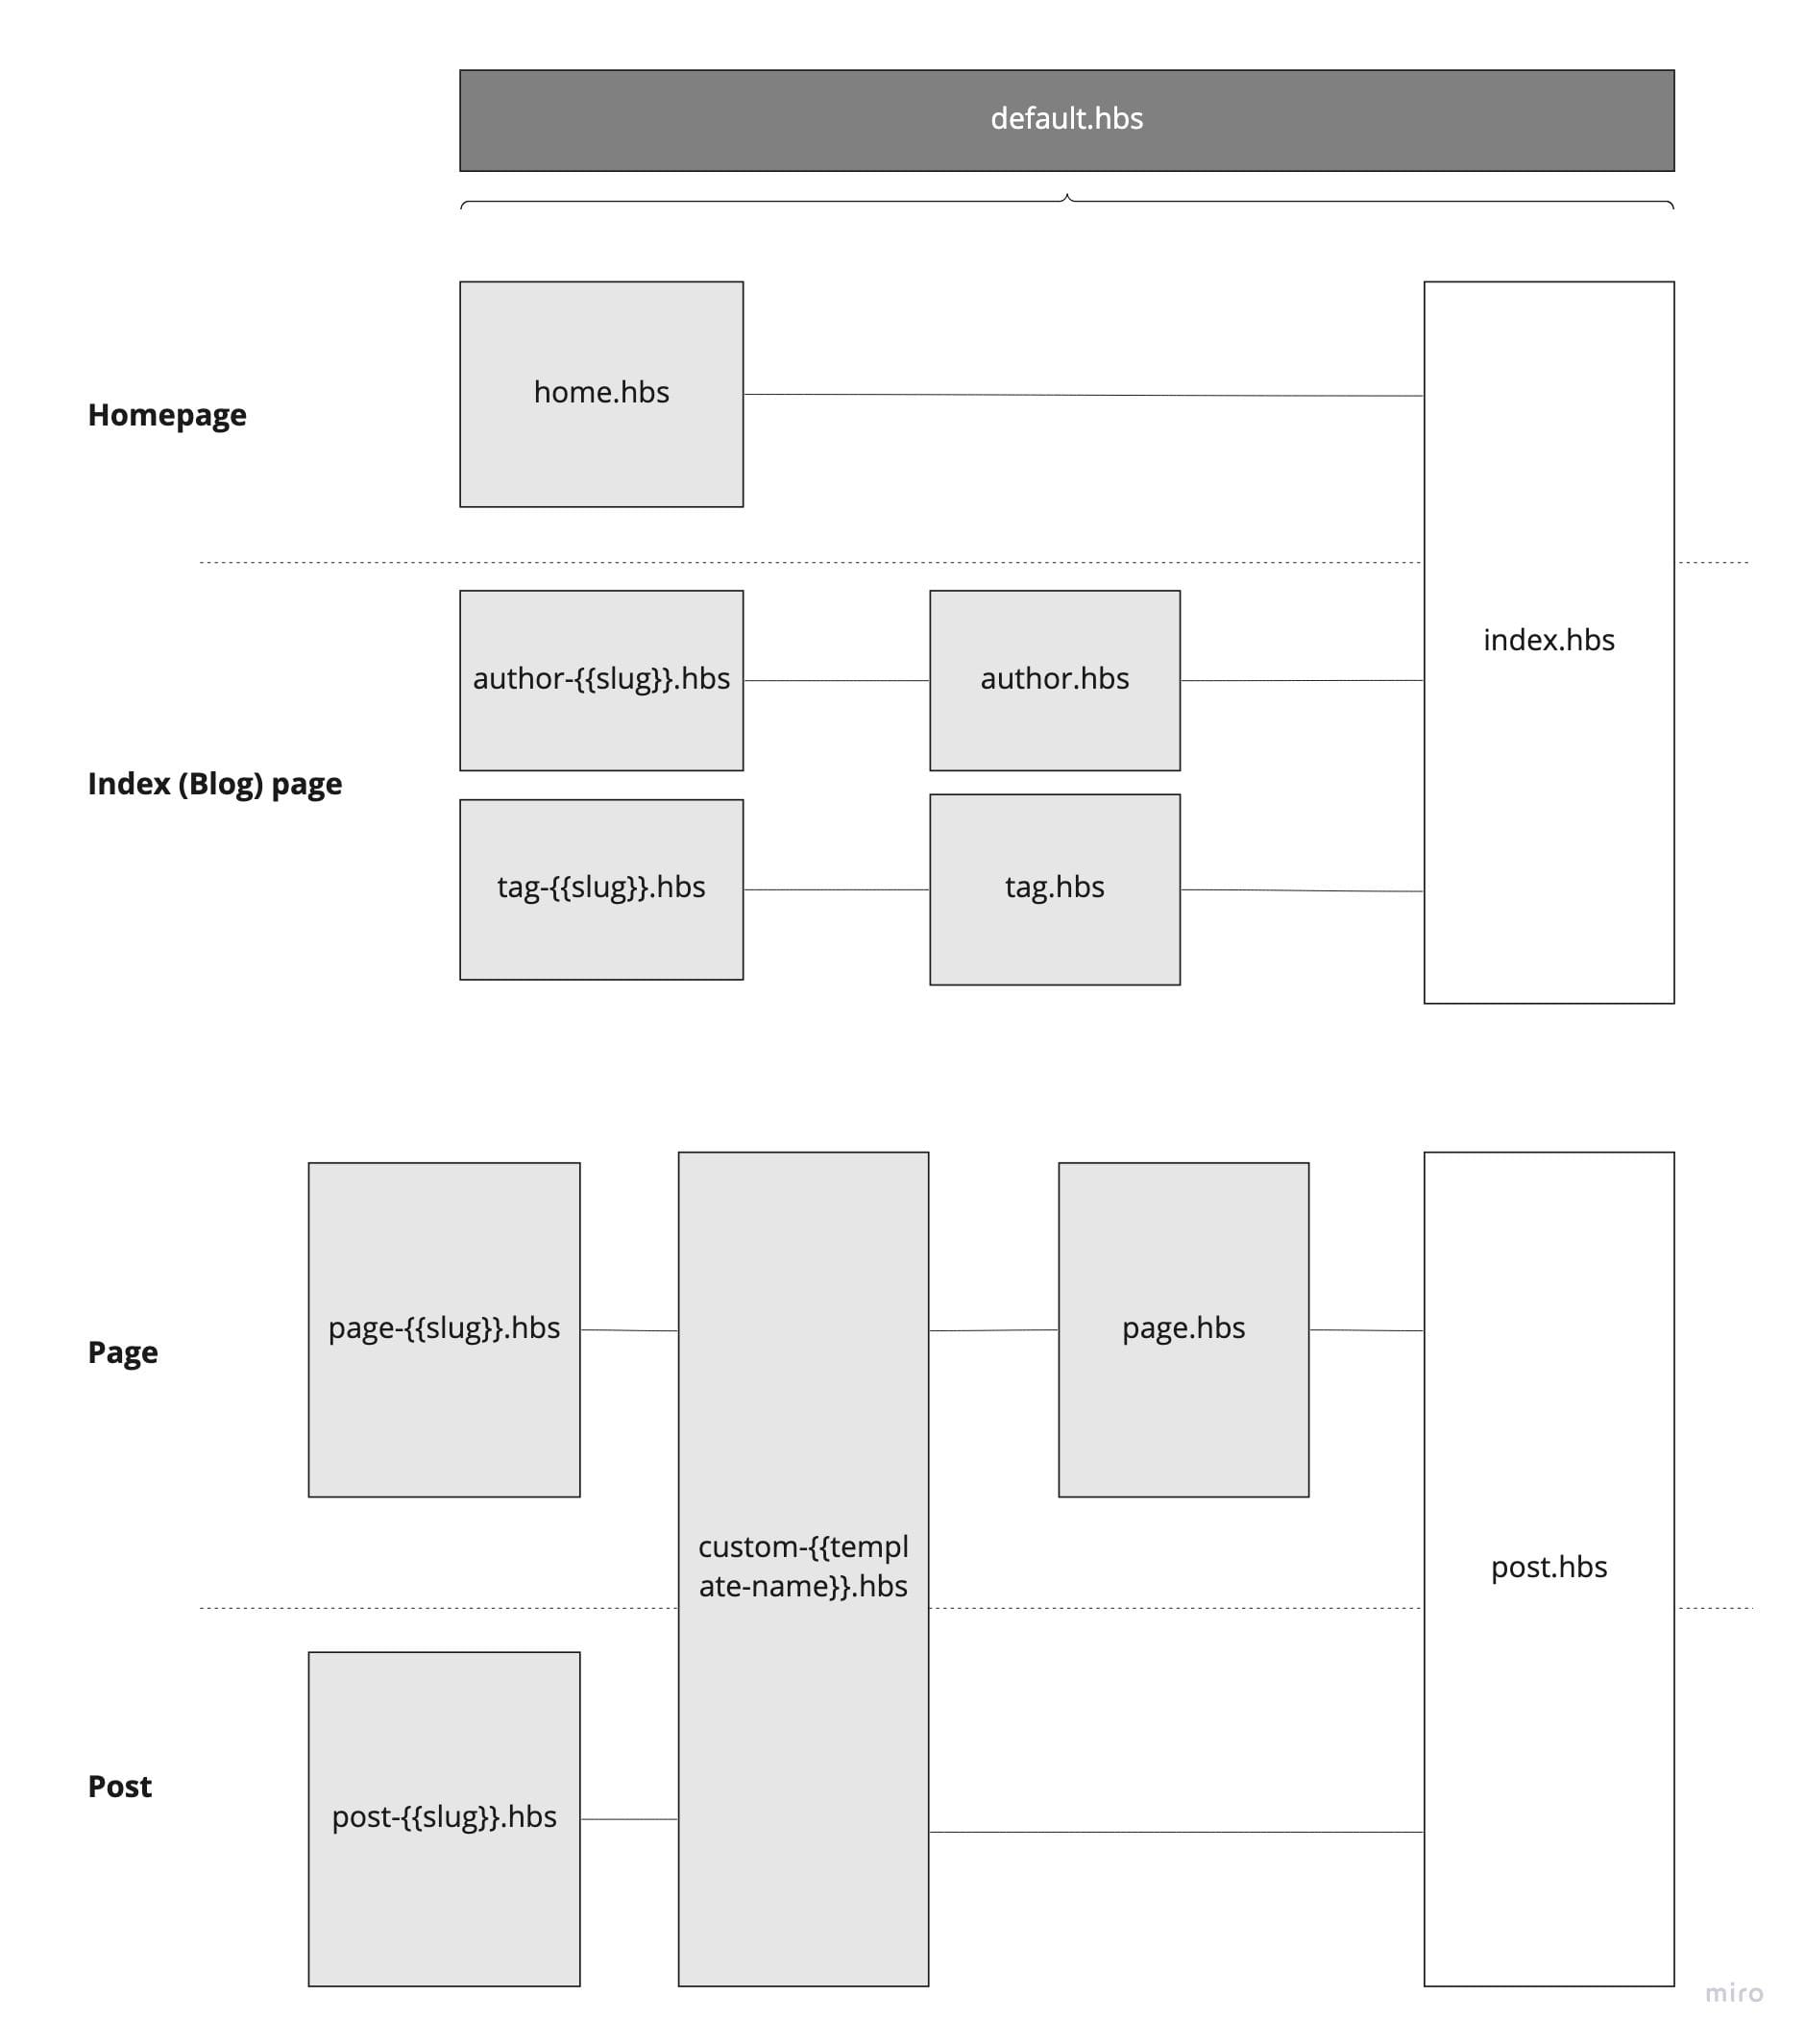
Step 3: Set Up the Ghost Theme File Structure
Create a new folder for your Ghost theme and set up the required structure:
your-theme/
├── assets/
│   ├── css/
│   │   └── screen.css       ← Your Webflow CSS goes here
│   ├── js/
│   │   └── main.js          ← Your custom JavaScript
│   └── images/              ← Theme images (icons, logos)
├── partials/
│   ├── header.hbs           ← Site header/navigation
│   ├── footer.hbs           ← Site footer
│   └── post-card.hbs        ← Blog post card component
├── default.hbs              ← Main layout wrapper
├── index.hbs                ← Homepage template
├── post.hbs                 ← Single post template
├── page.hbs                 ← Static page template
├── tag.hbs                  ← Tag archive template
├── author.hbs               ← Author archive template
├── error.hbs                ← Error page template
└── package.json             ← Theme metadata
Step 4: Convert HTML to Handlebars Templates
This is where most of the work happens. You need to take Webflow's static HTML and replace hardcoded content with Ghost's Handlebars helpers.
default.hbs — Extract the common HTML structure (head, header, footer) from any Webflow page:
<!DOCTYPE html>
<html lang="{{@site.locale}}">
<head>
    <meta charset="utf-8">
    <meta name="viewport" content="width=device-width, initial-scale=1">
    <title>{{meta_title}}</title>
    {{ghost_head}}
    <link rel="stylesheet" href="{{asset "css/screen.css"}}">
</head>
<body class="{{body_class}}">
    {{> header}}

    {{{body}}}

    {{> footer}}
    {{ghost_foot}}
</body>
</html>
Key conversions from Webflow to Ghost Handlebars:
| Webflow (Static HTML) | Ghost (Handlebars) | Purpose |
|---|---|---|
<title>My Blog</title> | <title>{{meta_title}}</title> | Dynamic page titles |
| Hardcoded navigation links | {{navigation}} | Ghost-managed navigation |
| Static blog post list | {{#foreach posts}} ... {{/foreach}} | Dynamic post loop |
| Hardcoded post title | {{title}} | Dynamic post title |
| Static post content | {{content}} | Dynamic post body |
| Hardcoded author name | {{primary_author.name}} | Dynamic author data |
Static image src | {{feature_image}} | Dynamic feature image |
| Hardcoded date | {{date published_at format="MMMM DD, YYYY"}} | Formatted publish date |
| CSS file path | {{asset "css/screen.css"}} | Versioned asset URLs |
index.hbs — Replace Webflow's static blog listing with Ghost's post loop:
{{!-- Homepage with post listing --}}
{{#foreach posts}}
  <article class="post-card">
    {{#if feature_image}}
      <img src="{{feature_image}}" alt="{{feature_image_alt}}">
    {{/if}}
    <h2><a href="{{url}}">{{title}}</a></h2>
    <p>{{excerpt words="30"}}</p>
    <time datetime="{{date format="YYYY-MM-DD"}}">
      {{date published_at format="MMMM DD, YYYY"}}
    </time>
  </article>
{{/foreach}}

{{pagination}}
post.hbs — The single post template:
{{#post}}
  <article class="post-full">
    <h1>{{title}}</h1>
    <div class="post-meta">
      <span>By {{primary_author.name}}</span>
      <time>{{date published_at format="MMMM DD, YYYY"}}</time>
      <span>{{reading_time}} min read</span>
    </div>
    {{#if feature_image}}
      <img src="{{feature_image}}" alt="{{feature_image_alt}}">
    {{/if}}
    <section class="post-content">
      {{content}}
    </section>
  </article>
{{/post}}
Step 5: Handle Webflow CSS
Webflow exports a compiled CSS file that includes all your classes. When converting to a Ghost theme:
- Copy the CSS file from Webflow's export to
assets/css/screen.css - Remove Webflow-specific classes that reference dynamic CMS elements (like
.w-dyn-list,.w-dyn-item) - Update class names in your Handlebars templates to match the Webflow classes you want to keep
- Remove Webflow's JavaScript dependency — the exported
webflow.jsfile handles interactions that may not work outside Webflow. Replace with custom JavaScript as needed.
Tip from experience: Do not try to keep 100% of Webflow's CSS. Ghost themes work best with clean, minimal stylesheets. I recommend keeping only the typography, color, and layout styles, then rebuilding interaction styles from scratch.
Step 6: Create package.json
Every Ghost theme requires a package.json file in the root directory:
{
  "name": "your-theme-name",
  "description": "Migrated from Webflow",
  "version": "1.0.0",
  "engines": {
    "ghost": ">=5.0.0"
  },
  "license": "MIT",
  "author": {
    "name": "Your Name",
    "url": "https://yoursite.com"
  },
  "config": {
    "posts_per_page": 10
  }
}
How Do You Import Your Content into Ghost?
Step 7: Convert Webflow CMS Content to Ghost Format
Ghost accepts content imports in its own JSON format. To convert your Webflow CSV exports:
- Manual approach: For small blogs (under 20 posts), you can manually copy-paste content into Ghost's editor. This gives you the cleanest result and lets you improve content as you migrate.
- Script approach: For larger sites, write a Node.js script that reads the Webflow CSV and generates Ghost's JSON import format:
// Ghost import JSON structure
{
  "db": [{
    "data": {
      "posts": [{
        "title": "Your Post Title",
        "slug": "your-post-title",
        "html": "<p>Your post content in HTML</p>",
        "status": "published",
        "published_at": "2026-01-15T10:00:00.000Z",
        "created_at": "2026-01-15T10:00:00.000Z",
        "updated_at": "2026-01-15T10:00:00.000Z"
      }],
      "tags": [{
        "name": "Your Tag",
        "slug": "your-tag"
      }]
    }
  }]
}- Third-party tools: Services like Ghost's official migration guides list community tools that can help automate the conversion.
Step 8: Upload Images to Ghost
Webflow hosts your images on their CDN. After migration, those URLs will still work, but you should re-upload images to Ghost for two reasons:
- Independence: If you cancel your Webflow plan, CDN-hosted images may eventually break
- Performance: Ghost optimizes images for its own delivery pipeline
Download all images from your Webflow export's images/ folder and upload them to Ghost via the admin panel or the Ghost Admin API. Update image URLs in your imported content to point to Ghost's /content/images/ paths.
How Do You Preserve SEO Rankings During Migration?
This is the most critical step. A sloppy migration can destroy months or years of search engine rankings. From having managed multiple site migrations, here is the exact SEO checklist I follow:
Step 9: Set Up 301 Redirects
Map every old Webflow URL to its new Ghost URL. Ghost supports redirects via a JSON file:
- Go to Ghost Admin → Settings → Labs
- Upload a
redirects.jsonfile:
[
  {"from": "/old-webflow-slug", "to": "/new-ghost-slug", "permanent": true},
  {"from": "/blog/old-post", "to": "/old-post", "permanent": true}
]
Common URL pattern differences:
| Webflow Pattern | Ghost Pattern | Redirect Needed? |
|---|---|---|
/blog/post-slug | /post-slug | Yes — Ghost uses flat URLs by default |
/category/tag-name | /tag/tag-name | Yes — Ghost uses /tag/ prefix |
/about | /about | No — if slug matches |
/blog | / | Depends on your setup |
Step 10: Verify SEO Elements
After migration, check that these elements carried over:
- Meta titles and descriptions: Set these manually in Ghost's post settings panel for each post
- Canonical URLs: Ghost generates these automatically, but verify they match the new structure
- Sitemap: Ghost auto-generates a sitemap at
/sitemap.xml— submit it to Google Search Console - Open Graph and Twitter cards: Ghost includes these via
{{ghost_head}}— verify with the Twitter Card Validator and Facebook Sharing Debugger - Structured data: Ghost outputs JSON-LD structured data automatically for articles, authors, and the site
How Do You Test and Deploy Your Ghost Theme?
Step 11: Test Locally
- Install a local Ghost instance:
ghost install local - ZIP your theme folder:
cd your-theme && zip -r your-theme.zip . - Upload via Ghost Admin → Settings → Design → Change theme → Upload
- Ghost will validate the theme and report any errors
Use the GScan tool to validate your theme against Ghost's requirements before uploading. It catches missing files, deprecated helpers, and compatibility issues.
Step 12: Deploy to Production
- Upload the theme ZIP to your production Ghost instance
- Activate the theme
- Import your content (JSON file from Step 7)
- Upload the redirects.json file
- Test all pages, posts, and navigation links
- Submit the new sitemap to Google Search Console
- Monitor Google Search Console for crawl errors over the next 2-4 weeks
Ghost vs Webflow: When Does Each Platform Make Sense?
Before committing to migration, make sure Ghost is the right fit. Here is an honest comparison based on using both platforms:
| Feature | Ghost | Webflow | Winner |
|---|---|---|---|
| Blog publishing | Purpose-built editor, markdown support, scheduling | CMS editor works but has more friction | Ghost |
| Visual design | Theme-based, requires code for customization | Full visual builder, no-code design | Webflow |
| Memberships | Built-in with Stripe, free + paid tiers | Requires Memberstack or similar ($29+/mo extra) | Ghost |
| Newsletter | Built-in email sending, no extra cost | Requires Mailchimp, ConvertKit, etc. | Ghost |
| SEO | Clean HTML, auto sitemaps, structured data | Good SEO tools but heavier HTML output | Ghost |
| Performance | Node.js, fast page loads, lightweight | Can be slower with complex animations | Ghost |
| E-commerce | Limited (Stripe only, no product catalog) | Native e-commerce with product management | Webflow |
| Custom interactions | Requires custom JavaScript | Visual interaction builder, scroll animations | Webflow |
| Pricing (blog use) | $9-25/mo (Ghost Pro) or free (self-hosted) | $14-39/mo (CMS plan required for blog) | Ghost |
| Open source | Yes — full source code on GitHub | No — proprietary platform | Ghost |
| Self-hosting | Yes — any server with Node.js | No — Webflow hosting only | Ghost |
Choose Ghost if: Your primary goal is publishing content, building an audience, and monetizing through memberships or newsletters. Ghost eliminates the need for 3-4 separate tools (CMS + email + membership + payments).
Stay with Webflow if: Your site is design-heavy with complex animations, you sell physical products, or your team relies on visual no-code design tools. Migration only makes sense when Ghost's publishing advantages outweigh Webflow's design flexibility.
What Are Common Migration Problems and How Do You Fix Them?
| Problem | Cause | Solution |
|---|---|---|
| Broken images after migration | Images still pointing to Webflow CDN | Re-upload all images to Ghost's /content/images/ and update URLs |
| Missing styles on Ghost | Webflow's webflow.js handles dynamic styling | Replace dynamic styles with static CSS; rebuild interactions in CSS/JS |
| 404 errors on old URLs | URL structure differs between platforms | Set up redirects.json mapping all old URLs to new ones |
| Forms not working | Webflow forms are proprietary | Use Ghost's native membership forms or integrate with Formspree |
| Search ranking drop | Google re-crawling new URLs | 301 redirects + submit sitemap to GSC; rankings typically recover in 2-4 weeks |
| Theme validation errors | Missing required files or deprecated helpers | Run GScan before uploading; fix all errors |
| CMS content formatting lost | Rich text conversion issues | Review each post after import; use Ghost's editor to fix formatting |
| Navigation not matching | Ghost uses its own navigation system | Recreate navigation in Ghost Admin → Settings → Navigation |
Webflow to Ghost Migration: FAQs
Can I keep my Webflow design exactly as-is in Ghost?
You can replicate most of the visual design by converting Webflow's exported CSS into your Ghost theme. However, Webflow-specific features like interactions, animations triggered by scroll position, and the form handler will need to be rebuilt using CSS transitions, JavaScript, or removed entirely. The layout, typography, and color scheme can transfer cleanly.
How long does a Webflow to Ghost migration take?
A straightforward blog with 20-50 posts typically takes 2-5 days: 1 day for theme setup, 1-2 days for template conversion, and 1-2 days for content migration, redirects, and testing. Complex sites with custom interactions, e-commerce, or hundreds of pages can take 1-2 weeks.
Will I lose my Google rankings during migration?
Not if you set up proper 301 redirects for every URL that changes. Google typically processes 301 redirects within 1-2 weeks, and rankings should stabilize within a month. The most common mistake is forgetting redirects for category/tag pages or paginated archive URLs.
Can I migrate Webflow forms to Ghost?
Webflow's form handler is proprietary and will not work in Ghost. For newsletter signups, Ghost has built-in membership forms that work out of the box. For contact forms or other submissions, use a service like Formspree, Typeform, or embed a Google Form.
Do I need to keep my Webflow account after migrating?
You can cancel your Webflow site plan after migration if you have re-uploaded all images to Ghost and verified all content transferred correctly. Keep your Webflow account (free tier) for at least 30 days after migration in case you need to reference the original design or re-export any assets.
Can I use a pre-built Ghost theme instead of converting my Webflow theme?
Yes, and for many sites this is the faster approach. Ghost has a theme marketplace with free and premium themes. If your Webflow design is not highly custom, starting with a polished Ghost theme (like Casper, Edition, or Dawn) and customizing colors and fonts is often faster than a full theme conversion. You then only need to migrate content, not rebuild the design. For more on Ghost theme options, see our Ghost SEO tools guide.
What about Webflow e-commerce products?
Ghost does not have native e-commerce. If you sell physical products through Webflow, Ghost is not a direct replacement for that functionality. You would need to use a separate platform like Shopify for products and use Ghost purely for content and memberships. For digital products or subscriptions, Ghost's built-in Stripe integration handles payments directly.